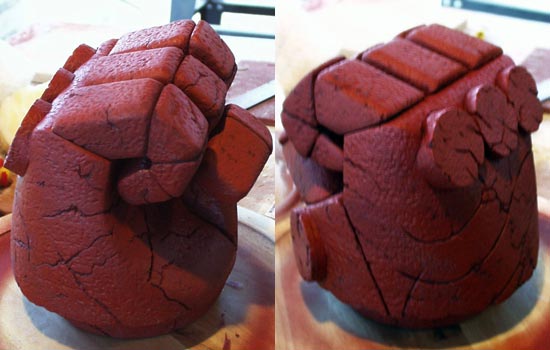
Hellboy's right hand of doom
january 2007
Hellboy is a 2004 film directed by Guillermo del Toro and starring Ron Perlman, loosely based on the Dark Horse Comics graphic novel Hellboy: Seed of Destruction by Mike Mignola. In the film, a demon-turned superhero known as Hellboy, secretly works to keep the world safe from paranormal threats with his team, the Bureau of Paranormal Research and Defense.
I was a HUGE fan of Mike Mignola’s comic book “Hellboy” long before it was a movie. Even though there were official prop replicas produced, I had 8 days of unused vacation time and a pile of scrap MDF so I decided to make my own “Right Hand of Doom”.
I wanted to make a wearable version of the Hand so I scaled the plans appropriately…maybe a bit bigger than the original just to accent the outrageous size. I laminated a bunch of 3/4″ MDF discs together to form the forearm, all hollowed out EXCEPT for the ends.
After it was smoothed, I cut out the ends.
The hand was constructed the same way, but with only a small hollow pocket for my hand.
I cut a dowel (fitting inside the wrist) to give me something to hold while wearing the hand. The hand was also lathed for smoothing and shaping, then the “palm” was defined with a cut on the table saw.
The final hand was to have a closed fist (unlike the open hand of the Official prop replica) so I had to form each finger joint individually to fit in this position. Note the extra knuckle on each finger!
More definition to the hand.
Here is the handle inside the wrist. The other notches are mistakes…I needed the Hellboy hand to line up with mine inside.
As most of the pieces were nearing completion, I needed to figure out how to replicate the ancient stone texture of the hand. On scrap of MDF , I started with a bullet-shaped grinding stone bit to rough up the surface.
Next I used a round grinding bit to add pits.
Then I used a fine grinding stone bit to add cracks.
The final step was to spray some red on it just to see how it looked!
Adding texture to the fingers…
Texture added to the hand. With the hand texture done, it was time to tackle the disk-shaped knuckle plates. Since the back of the hand is rounded, I had to cut holes for the disks to sit into.
The knuckles blended and textured.
Forearm textured over several DAYS. After texturing, I sealed the MDF with a Sanding Sealer and then applied a rust red automotive Filler Primer.
I liked to color so much, I decided to proceed to applying the wash to bring out the details.
I planned ahead and added a lip at the end of the forearm so I could attach the hand with wood screws.
BUT before I could do that, I needed to line the inside to make it more comfortable to wear. I found a cool burgundy leather textured vinyl that would work great. I cut a piece to size, glued the seam with contact cement.
Since it’s an interior lining the seam had to be glued on the inside…
The lining inserted into the hand…
The wrist end was tacked into place with small nails.
From the other end, I attached the hand to the forearm using long wood screws from the inside. Then Foam padding was inserted BETWEEN the lining and the forearm walls.
Then once everything was in place, I glued the edge of the lining to the forearm.
Anyone for a game of “Demon Proctologist” or “Alien Drug Mule”?
I used the same MDF method to build a sturdy base for the hand.
I wanted to make a nice logo plaque to mount on the base. I printed out the Hellboy comic logo in reverse, placed it face down on .060 styrene, wet it with lacquer thinner and burnished. When you remove the paper, a nice copy is magically applied to the plastic! I trimmed out the logo with an Xacto and glued it to heavy .090 styrene plastic. I found some cool bolts in the junk can and drilled holes in the plaque for them.
The plaque was painted and weathered exactly like the hand.
The final base. It was textured with shellac applied with a sponge and then painted black. I also added some felt bumpers to the top to protect the finish on both the base and hand.
And since it’s wearable, here’s what it looks like on a human.